

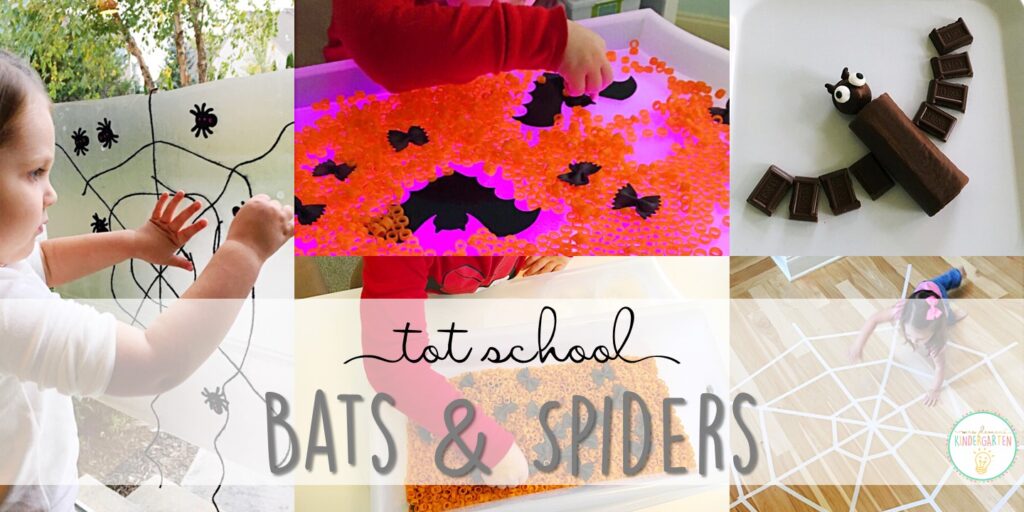
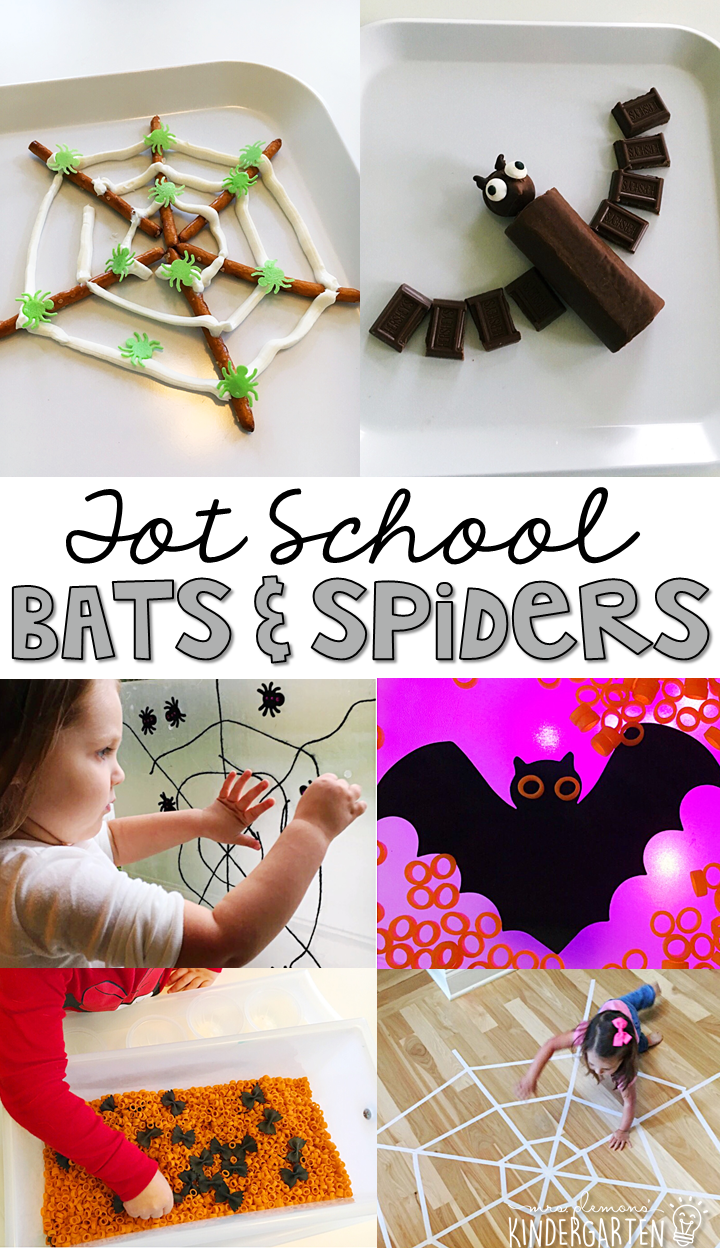
Teaching about anything creepy and crawly really isn’t my forte. Truth be told I kind of freak when I see any critters running around (let’s not even get into my fear of mice!). But I do my best to suck it up and teach about things like bats and spiders every year and we had a really fun week getting into the Halloween spirit!
**This post contains affiliate links for your convenience. View our full disclosure policy here.**
Here were our plans for Bats & Spiders Week:
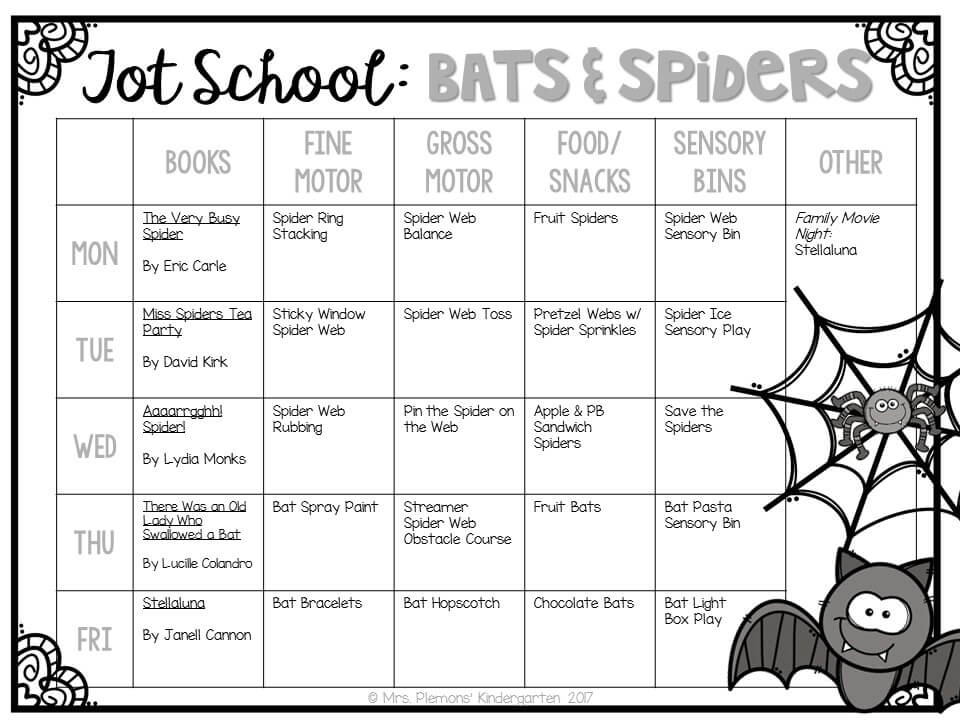
And here are the details of each activity:
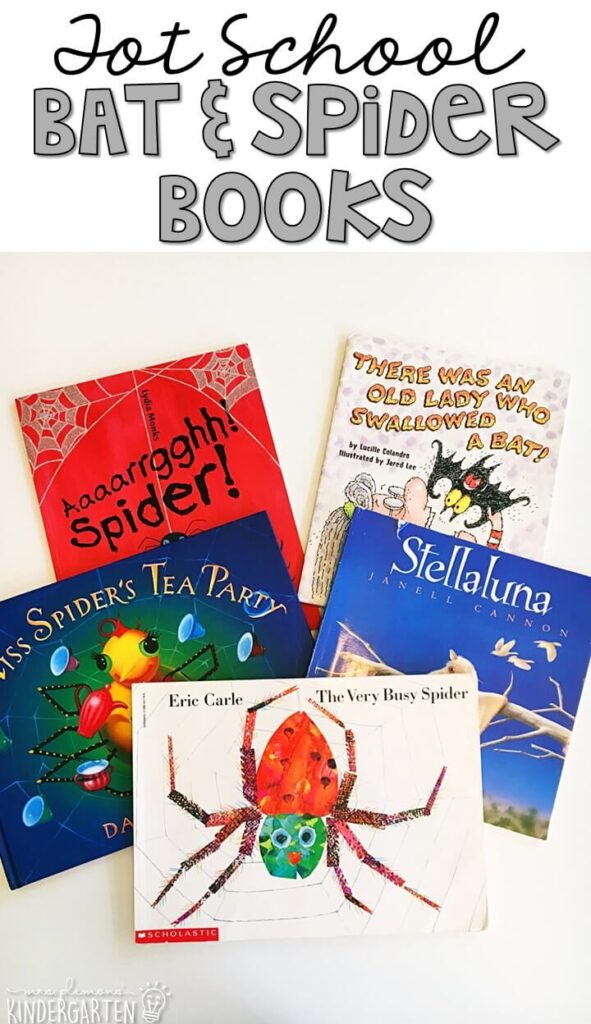
Here are the books that we used to begin each day:
The Very Busy Spider by Eric Carle
Miss Spiders Tea Party by David Kirk
Aaaarrgghh!Spider! by Lydia Monks
There Was an Old Lady Who Swalowed a Bat by Lucille Colandro Stellaluna by Janell Cannon
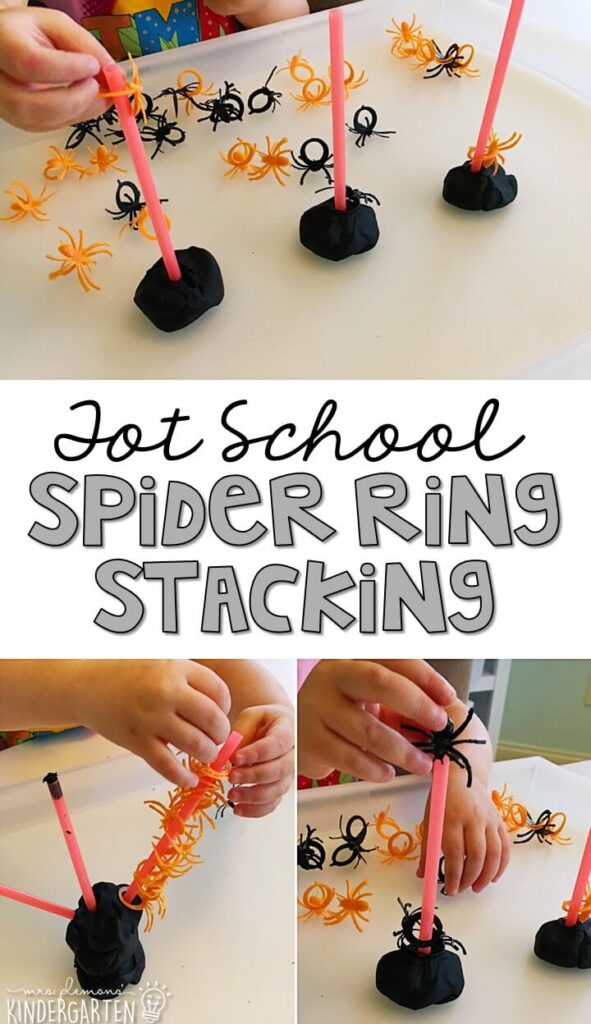
Spider Ring Stacking:
Madelynn loved stacking, sorting (and wearing) these little spider rings. I loved that this activity was cheap and easy to set up! Start with a few blobs of play dough, stick some straws in, pour out a bag of spider rings, and let your little one explore!
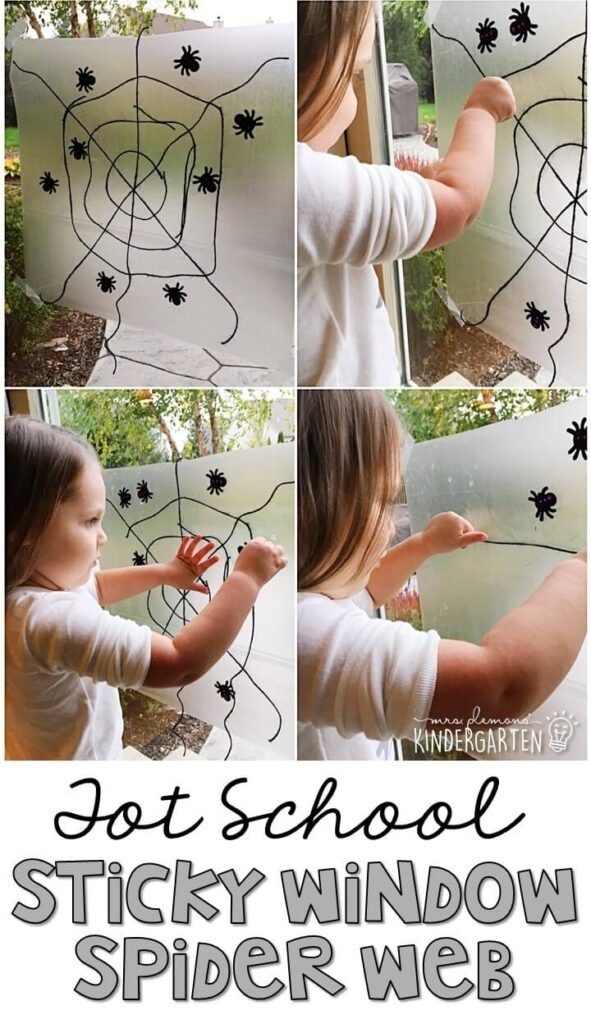
Sticky Window Spider Web:
I’ve been seeing lots of sticky window and sticky wall set ups from other tot schoolers I follow so I decided to give it a shot. Let me tell you that this was probably the most engaged I’ve seen Madelynn in any new activity we’ve tried since the first day she discovered water beads. All you need to do for this fine motor activity is tape a sheet of contact paper sticky side out to a window or wall. Give your little some string and small felt spiders and let them explore. It’s like a sticker book that just keeps on giving. We will definitely be doing more activities like this again!

Spider Web Rubbing:
This activity turned out to be a little trickier than I thought it would be but we made it work with lots of hands on help from me. I started by creating a web with hot glue on a sheet of card stock. After that cooled I gave Madelynn a white sheet of card stock and an unwrapped black crayon to rub over top. Well the paper slid all over and she was quickly frustrated. I tried taping both pages together and that helped a little, but it was still a little tricky so we ended up doing the rubbing together.
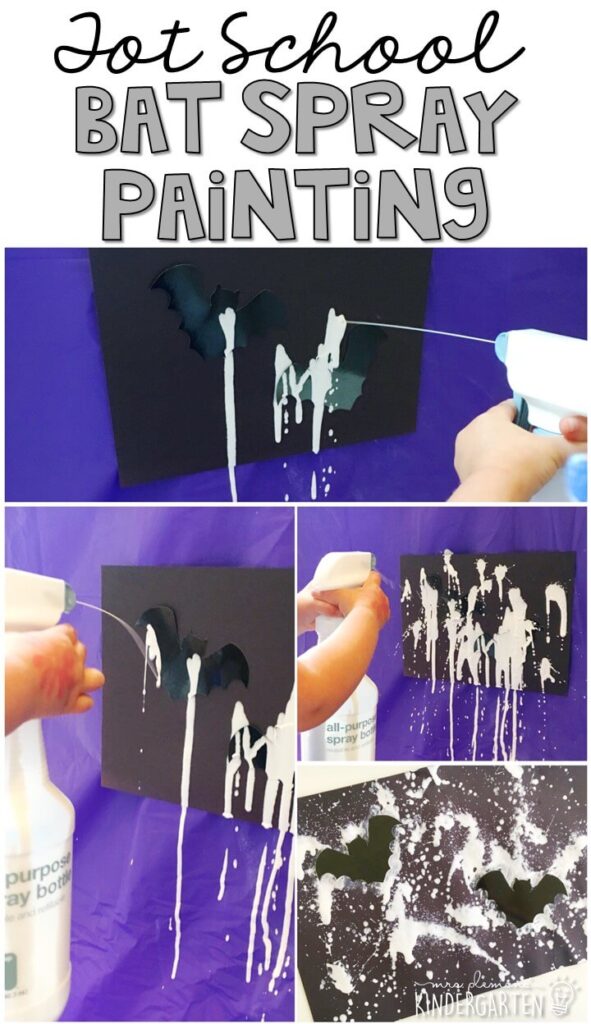
Bat Spray Painting:
I started out by taping 2 bat cut outs onto black construction paper. (Make sure to really tape down all the edges so the paint doesn’t sneak in!) Then I taped that to a plastic table cloth I hung on the wall. Next I filled a spray bottle with white paint mixed with a little bit of water to thin it out just enough to spray and not clog our spray bottle.Then Madelynn sprayed and sprayed to her heart’s content until the outline of each bat was sufficiently covered. After the paint dried I pulled off the bat cut outs and we were left with a pretty “Bats at Night” art piece.
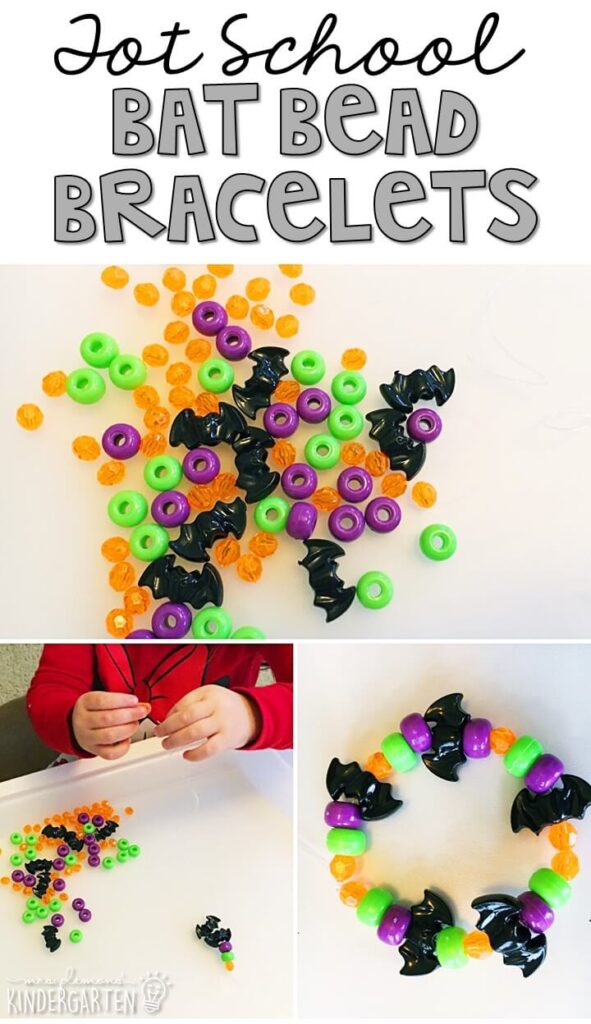
Bat Bead Bracelet:
I found these cute bat beads at the craft store and added a few Halloween colored beads to the mix for Madelynn to use. I taped a piece of elastic to our tray for Madelynn to thread the beads on to and she created this cute little bracelet to wear for Halloween.
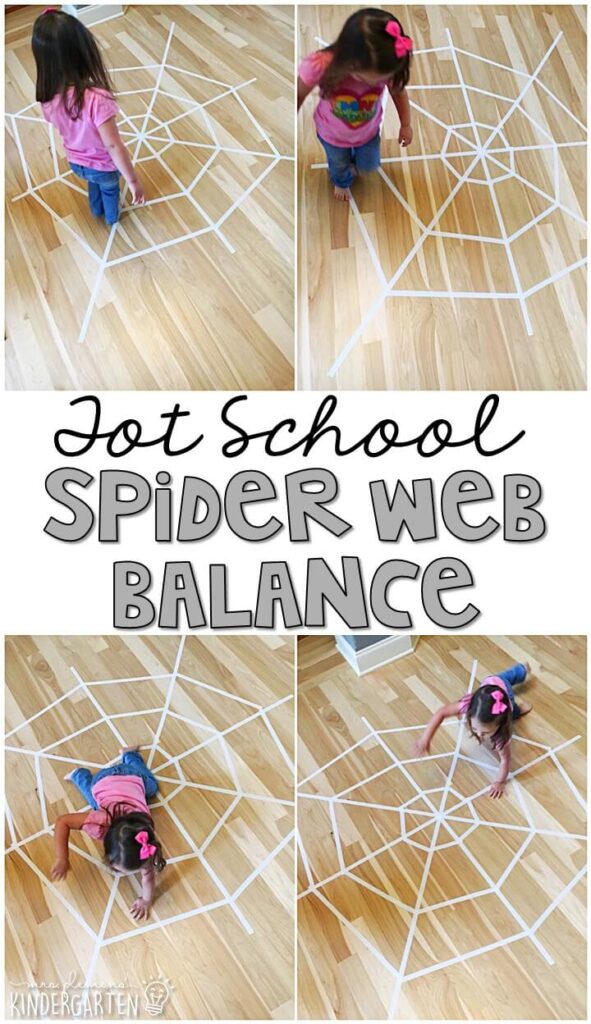
Spider Web Balance:
This was such a fun activity for a variety of gross motor practice. I started with white electrical tape and created a web on the floor. Then I asked Madelynn to balance on each line to cross the web. After she did this a few times, she got down on the ground and pretended to be a spider crawling on her web. Then we practiced hopping on one foot, jumping, sliding and rolling on the web.
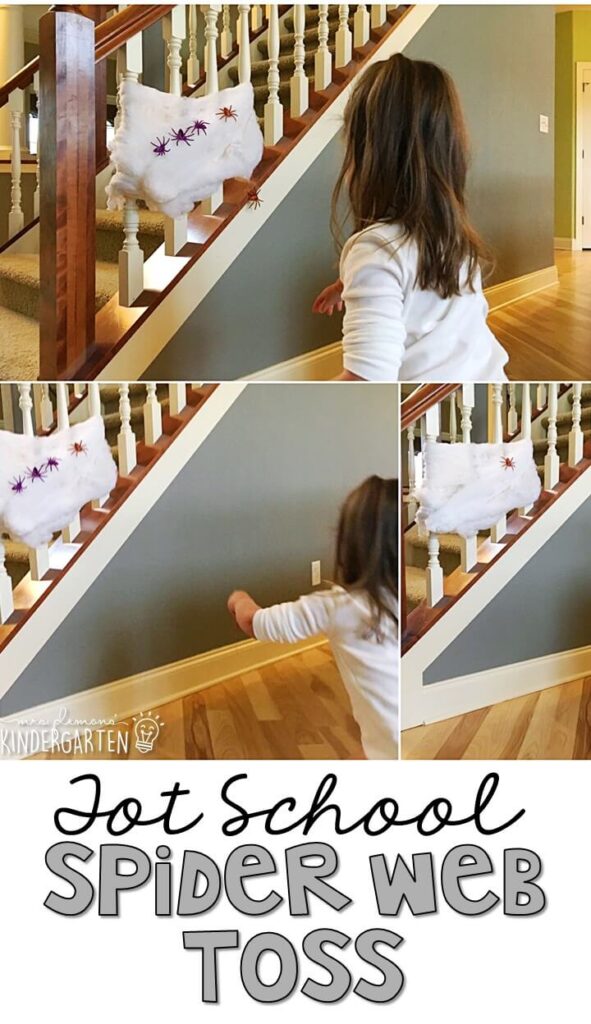
Spider Web Toss:
For this throwing game, I took some fake cobweb material and strung it across our staircase. Then I gave Madelynn some glittery plastic spiders to throw. The web is so sticky that even if the spiders barely touched it they stuck, so it was easy for Madelynn to feel successful.
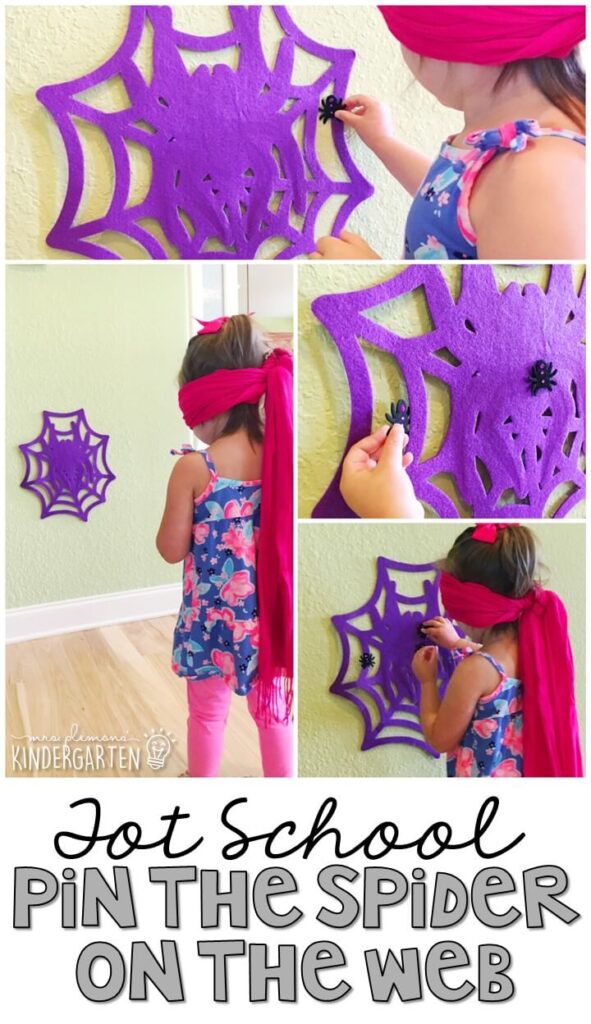
Pin the Spider on the Web:
For this activity, I started with a felt web decoration I found at the dollar store. Next, I blindfolded Madelynn. Then I gave her a felt spider and spun her around a few times. And just like the classic party game, she tried to make her way over to the web to get the spider in the center of the web.
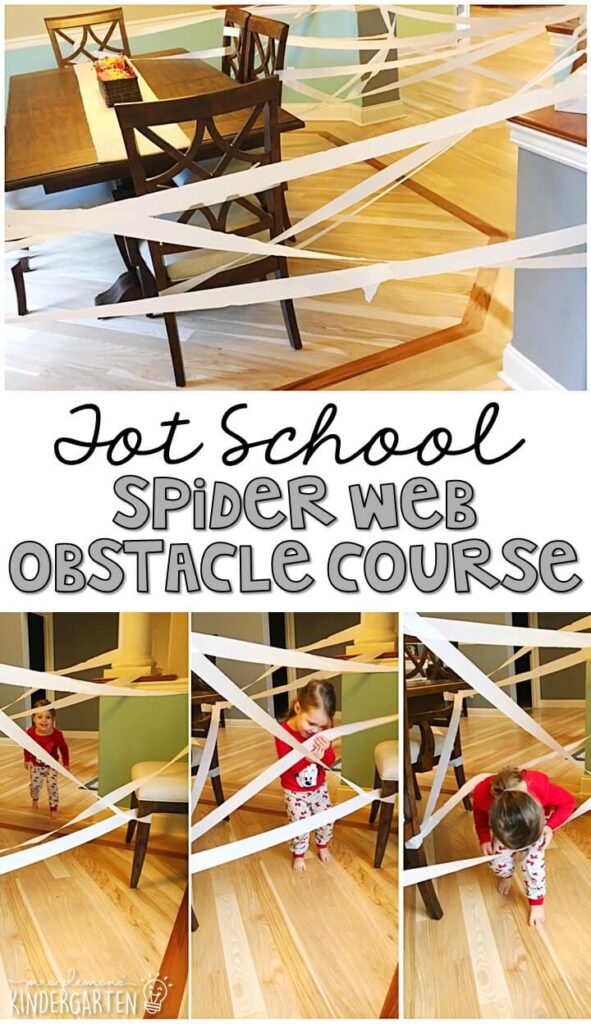
Spider Web Obstacle Course:
While Madelynn was sleeping I used white streamers and created a huge spider web in our dining room. I choose to make it there because the chairs were really useful for making the web zig zag up and down and all over the room. I told Madelynn that she was a bug that had to fly through the web without getting stuck or the spider would eat her. Honestly Madelynn thought this game was fun, but actually enjoyed tearing the streamers down more than crawling through them.
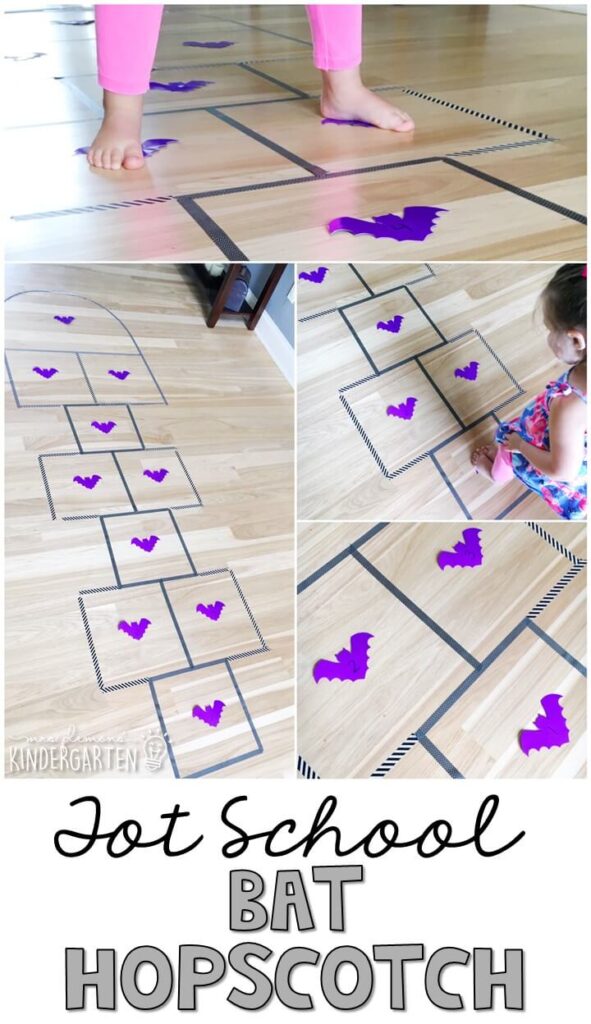
Bat Hopscotch:
This game would work indoors or out but it was pretty rainy outside so we opted for the indoor version. First, I used washi tape to lay out a hopscotch game on the floor. Then I taped bat cut outs with the numbers 1-10 written on them inside each box. If you are playing outside you could use sidewalk chalk to make your hopscotch board. Then Madelynn practiced jumping and counting up and down the board all afternoon.

Bat & Spider Snacks:
Fruit Spider Snack: Use a toothpick to attach 2 grapes together. Thread raisins onto 8 toothpicks to make legs. Push legs into the spider body.
Spider Snack: Lay pretzels out on a plate and drizzle melted white chocolate to connect the pieces in a web formation. Add spider sprinkles before chocolate sets. Refrigerate for 15 minutes or so until chocolate hardens.
Apple and Peanut Butter Sandwich Spiders: Slice apples into circles. Spread with peanut butter and sandwich together. Stick 8 pretzel sticks between the apples for legs. Use a dab of peanut butter to attach 2 candy eyes.
Bat Snack: Fill a snack baggie with Halloween themed grape gummies. Glue googly eyes to a clothespin and draw a mouth. Clip to the center of the bag.
Chocolate Bat Snack: Start with a chocolate HoHo in the middle. Break apart chocolate bars for the wings. Use a Hershey kiss for the head, add mini chocolate chips for ears, and candy eyes to finish off the face.
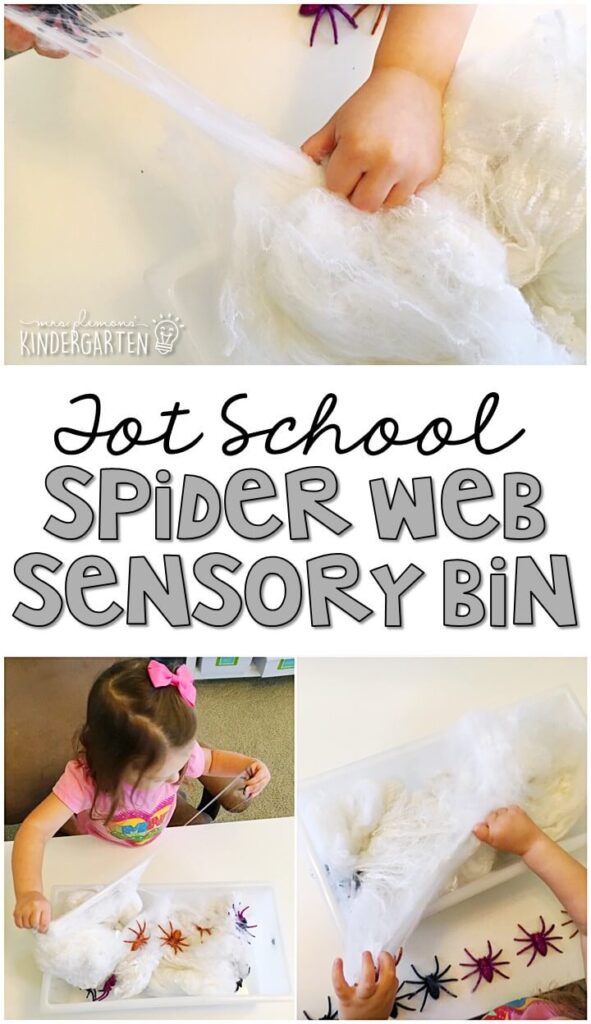
Spider Web Sensory Bin:
In this bin: fake cobweb material and glittery plastic spiders Our first sensory bin this week was made with the same web we used for the spider toss game. Getting the spiders unstuck from the web was quite the challenge and great for building those little hand muscles.
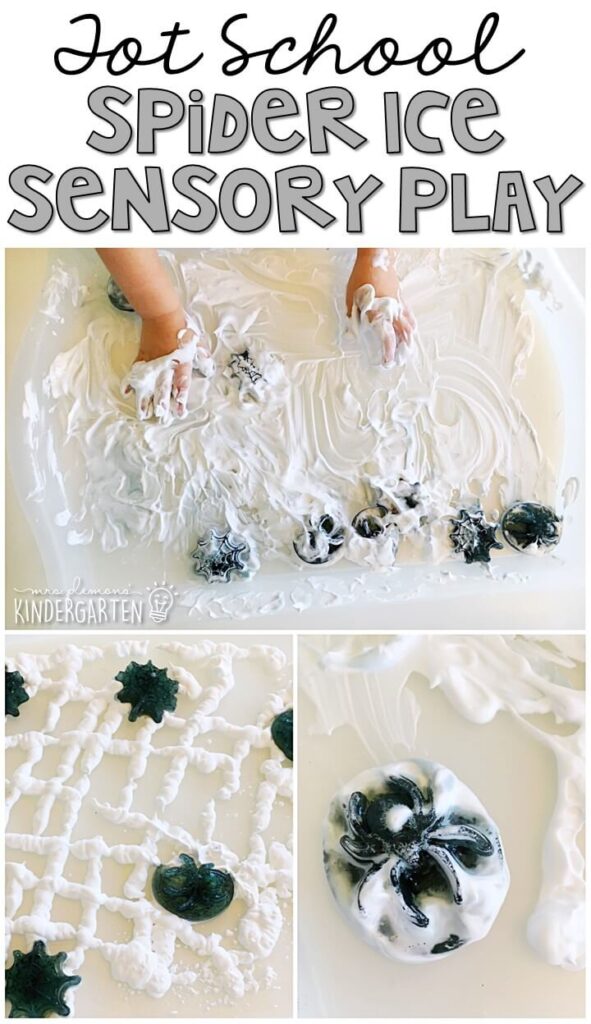
Spider Ice Sensory Play:
In this bin: shaving cream and ice spiders
This activity was really messy but a lot of fun for Madelynn. I spread some shaving cream webs out on our tray and then added black ice spiders that I made using a spider shaped ice tray and black food coloring.
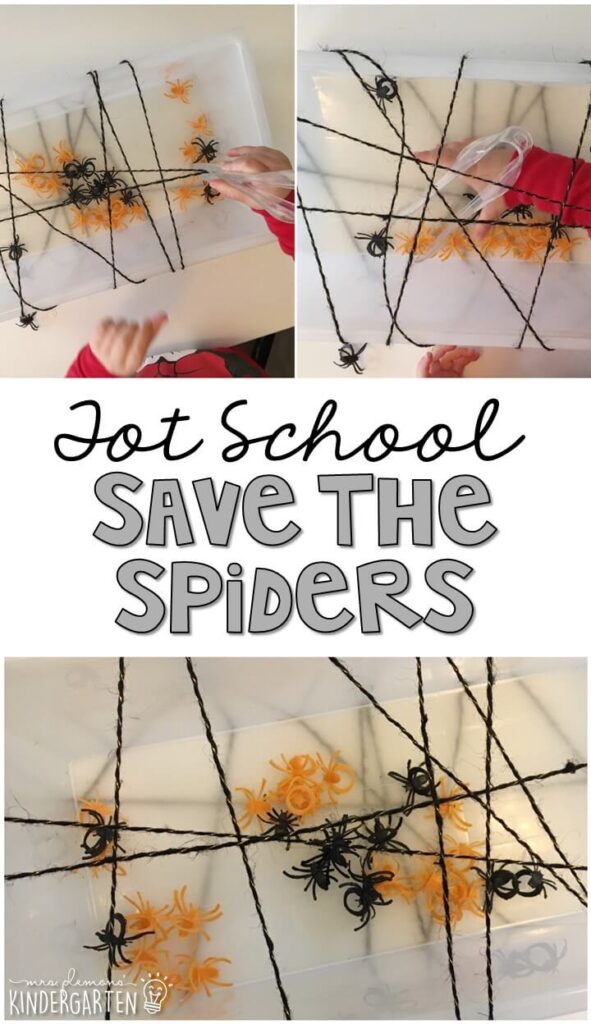
Save the Spiders:
In this bin: spider rings, yarn and gator grabber tweezers
This bin was all about fine motor practice. I wrapped our sensory bin with yarn, then dropped the spider rings inside. Madelynn had to rescue the spiders with her tweezers by reaching through the webs.
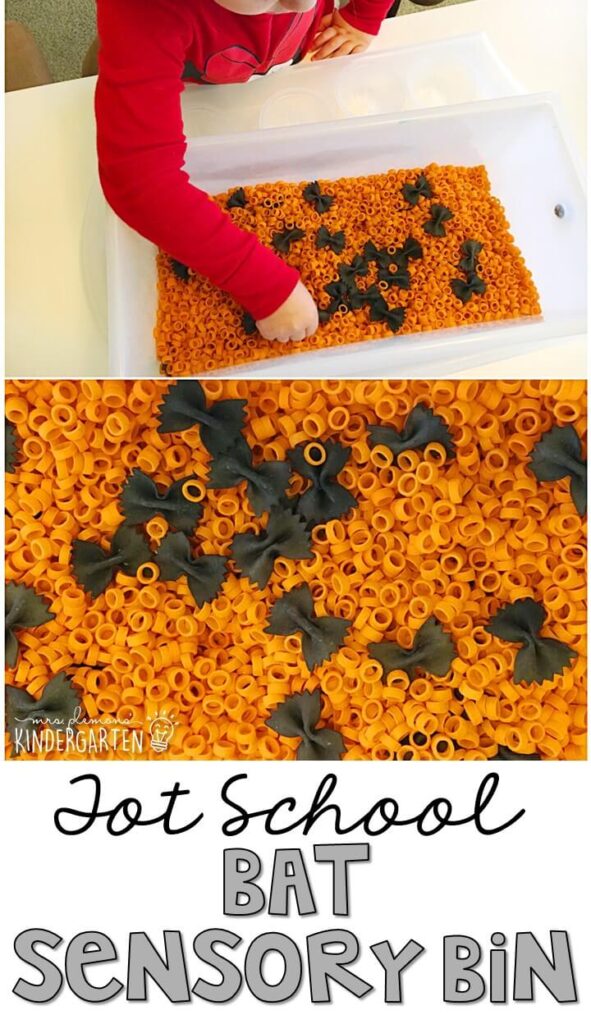
Bat Sensory Bin:
In this bin: orange ring and black bow tie pasta shapes
The bow tie pasta made such perfect little bats. I planned to make counting sheets for this one but ran out of time, so we just had free time with this one.
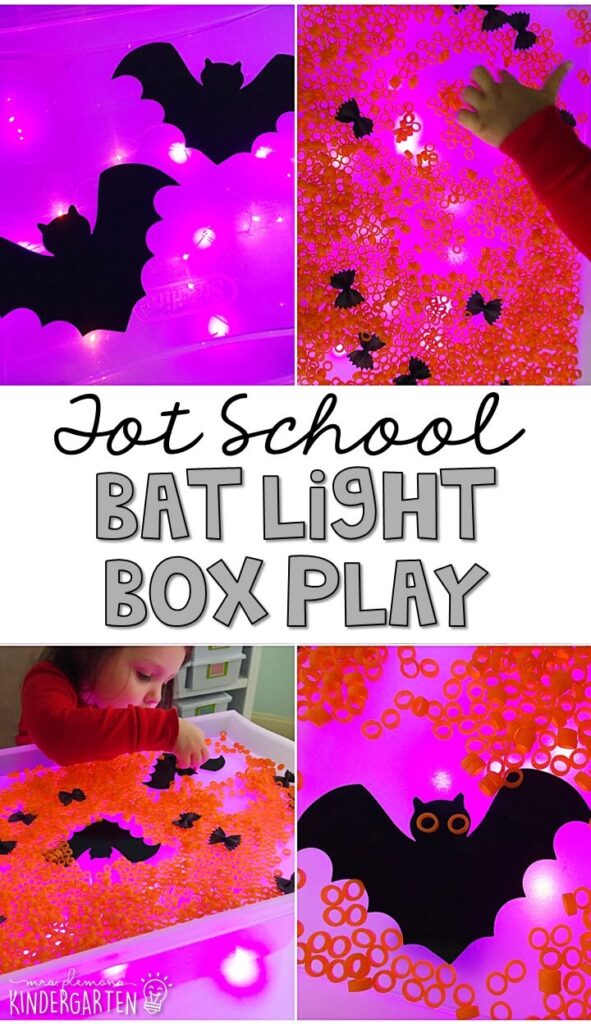
Bat Light Box:
I don’t really have an official light box, but I found these battery powered LED lights in the Target Dollar Spot so I threw them in an empty Sterilite container and put our clear IKEA tray on top and it actually worked pretty well. I wasn’t sure what I wanted to use since this was our first attempt at using a light box, so I started out with a few bat cut outs on top. When that really wasn’t holding Madelynn’s attention, I poured our bat sensory bin on top too for her to play with. She had fun making the bats fly through the night sky and pretended to give them all eyes too.
Want all of this week’s Bats & Spiders activities for tot school? You can grab them here:
On my site : Bats & Spiders Plans & Printables On TpT: Bats & Spiders Plans & Printables
Or you can grab our entire year of themes and plans:
On my site here: Tot School Bundle On TpT here: Tot School Bundle
Then check out the rest of our 35+ themes on the Tot School Curriculum Main Page.


I love the bat spray painting! I'm having a difficult time getting the tape right, though. Can you elaborate on your method at all for me? Please and thank you! 🙂
I used strips of removable doublestick tape along the edges. You could also lay the paper flat on the ground which may help the paint not drip behind the cut outs.
These are wonderful ideas! Love everything about them!
thank you so much!